Most people hire a ceiling contractor in this manner: they get a price, agree a date and hope. Then the dust arrives, the room fills with scaffolding and nobody has explained what happens next, why it takes as long as it does, or what to check before the final payment. This guide from Suimas Interior Designers walks you through the ceiling installation process, step by step, from the first site visit to handover. It is written mainly for gypsum board ceilings (the most common type in Kenyan homes and offices), with notes on how a suspended grid and tile ceiling differs. Knowing the sequence helps you ask better questions, spot corner-cutting and plan your life around the work.
For the materials themselves, see Gypsum Board Ceilings: Pros, Cons and Best Applications and Suspended Ceilings: Cost, Installation Time and Best Use Cases.
The process at a glance
| Stage | What happens | Typical share of the timeline |
|---|---|---|
| 1. Site visit and survey | Measure, assess the slab, check services | Before work starts |
| 2. Design and lighting plan | Ceiling shape, lighting layout, sections and details | Before work starts |
| 3. Quotation and scope | Itemised price, materials, programme | Before work starts |
| 4. Preparation | Protect the space, deliver materials, clear access | Day one |
| 5. Set-out | Mark levels and lines | Short |
| 6. Services first fix | Electrical, air conditioning, alarms run through the void | Coordinated with other trades |
| 7. Frame installation | Hang the steel frame | Moderate |
| 8. Pre-boarding inspection | Check frame, services and levels | Short but essential |
| 9. Boarding | Fix the boards | Moderate |
| 10. Jointing, skimming and sanding | Make the surface seamless | The longest stage (drying time) |
| 11. Painting | Prime and paint | Moderate (drying between coats) |
| 12. Lighting and fittings | Install lights and fittings, commission | Short |
| 13. Snagging and handover | Final checks, cleaning, walk-through | Short |
Actual durations depend on the size of the area, the complexity of the design, access and how many trades are working together. Treat any timeline as a guide until a site visit confirms the programme. For a typical room we would quote [insert timeframe].
Step 1: Site visit and survey
Everything starts with measuring and looking. During the visit we:
- Measure the floor area and the clear height from floor to slab.
- Check the slab and walls for leaks, damp and cracks, since a ceiling built over an active leak will fail.
- Note where beams, columns and services sit.
- Locate air-conditioning units, pipes, existing wiring and anything that will affect the design.
- Ask how you use the room, so that the lighting and the ceiling shape suit it.
What to check as the client: that someone actually inspects the slab and the roof above, not just measures the floor.
Step 2: Design and lighting plan
The ceiling is a design decision before it is a construction one. At this stage the shape, the drop height, the cove positions, the downlight layout, the access panels and the finish are decided together. For rooms where the look matters, a 3D render lets you see the result before a board goes up. See 3D Interior Design Renders.
The lighting plan is the most important part of this step. Where the lights fall affects glare, mood and comfort, and the wiring has to be planned before boarding. Our article on gypsum ceiling lighting mistakes explains what happens when it is left until later, and Planning Home Ceiling Lighting shows how to plan it.
What to check: that you have seen a drawing or render, and that the lighting layout is on it.
Step 3: Quotation and scope
A good quote is itemised. It should list the area, board type and thickness, the frame, the finishing (jointing, skimming and painting), the lighting and electrical work, and what is excluded. It should also state the programme. Our guide to Gypsum Ceiling Cost in Nairobi explains how to read a ceiling quote line by line.
What to check: whether painting, electrical work and access panels are included or extra.
Step 4: Preparation and protection
Before work starts, the room is prepared:
- Furniture is moved out or covered and floors are protected.
- Materials are delivered and stored flat and dry. Gypsum boards bend and absorb moisture if stored badly.
- Access routes are cleared. Boards are long (commonly 2.4 m), so lifts, staircases and corridors matter.
- Power and water for the site are confirmed.
What to do as the client: remove valuables, cover or move furniture and tell neighbours or building management about delivery and working times.
Step 5: Set-out and levelling
The finished ceiling level is marked around the room using a laser or water level, so that the entire ceiling is perfectly flat. Layout lines for coves, trays, bulkheads and fittings are marked too. This step looks small but decides how straight every line will be. Mistakes here show up for years.
Step 6: Services first fix
This is where other trades come in. Electricians run cables and conduits for lights and switches. Air-conditioning installers fix pipes and ducts. Alarm, smoke detector, sprinkler and data installers position their equipment. Everything that will be hidden has to be finished and tested before the board covers it.
What to check: that the electrician has labelled circuits, left spare cable at each light position and positioned drivers where they can be reached.
Step 7: Frame installation
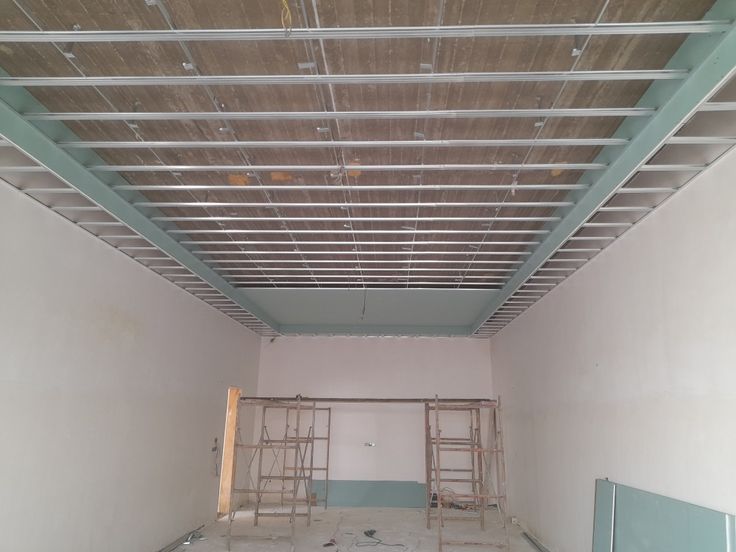
A steel frame is hung from the slab or roof structure on hangers, then main channels and cross channels form a rigid grid. The spacing of the channels and hangers is critical. Too wide, and the board sags or waves over time. Extra support goes in wherever there will be heavy fittings or a bulkhead, and around the perimeter of coves and trays.
For a suspended grid and tile ceiling: the process is similar, with a perimeter angle, hangers, main and cross runners, then tiles dropped in. It goes faster because there is no jointing or painting.
Step 8: Pre-boarding inspection
This is the stage that should never be skipped. Before the boards cover the frame, check:
- Is the frame level and rigid?
- Are all services tested and secured?
- Are the cove and tray details correct?
- Are access panels located where drivers, valves and junction boxes sit?
- If acoustic or fire performance is needed, is insulation in place and are gaps sealed?
Once the board is on, fixing mistakes means cutting it open.
Step 9: Boarding
Boards are screwed to the frame with the joints staggered, using the screw spacing and board type specified for the room. Moisture-resistant board goes in kitchens and bathrooms, fire-rated board where required and acoustic board in meeting rooms. Cut-outs for lights and diffusers are marked from the lighting plan.
Step 10: Jointing, skimming and sanding
This is the stage that decides whether a ceiling looks seamless or looks like a patchwork. Tape and jointing compound are applied over the joints and screw heads, left to dry, then sanded. The surface is skimmed and sanded smooth. Each coat needs to dry, which is why this stage takes the longest. Rushed jointing causes cracks and visible joints.
What to check: look at the ceiling in raking light (a torch held flat against the surface) to see ridges, joints and dips before painting.
Step 11: Painting
A primer goes on first to seal the surface, followed by finish coats. Painting is done before delicate lighting fittings go in. See Painting & Special Effect Finishes for the finishes we offer, including mould-resistant paint for humid areas.
Step 12: Lighting and fittings
Downlights, cove strips, pendants, diffusers and access panels are installed and tested. Dimmers and switching are checked for each zone. In cove lighting, the strip position and distance from the ceiling face are checked with the lights on, since small changes alter how the light lands. See Gypsum Ceilings & Integrated Lighting.
Step 13: Snagging, cleaning and handover
The final stage is a walk-through:
- Look at the ceiling with the lights on and off, and in raking light.
- Check that every light works and dims properly.
- Check the lines of coves and bulkheads are straight.
- Confirm access panels open easily.
- Check paint finish and touch-ups.
- Confirm the area is cleaned and debris removed.
Any issue is listed (a snag list) and fixed before final handover.
What to expect during installation
Dust. Sanding creates fine dust. Good contractors cover and seal doorways, but some dust is unavoidable, so move electronics and soft furnishings out or cover them.
Noise. Drilling and fixing are noisy. In offices and apartments, agree working hours with building management.
Drying time. Jointing and paint dry slowly in humid weather. A programme that ignores drying is a programme that produces cracks.
Other trades. Electricians and air-conditioning installers need access at the right time. Coordination is one of the main reasons a project runs long.
Renovation: replacing an existing ceiling
If you are replacing an old ceiling, the first step is removing and disposing of the old one, then checking the slab and fixing the cause of any stains. This adds time and dust, and is covered by our Renovation Services.
For a look at the installation process in a wider context, see Gypsum Ceilings Installation Kenya.
Book a site visit with Suimas Interior Designers
Send us your room dimensions, ceiling height and photos, and we will visit, advise and quote. We install ceilings across Kenya and East Africa.
Call or WhatsApp 0717 044 443.
Related Post Resources
- Living Room Interior Design
- Bedroom Interior Design
- Office Interior Design & Fit-Outs
- Floor Installation Services
- Full House Interior Design
- Ceiling Types for Living Rooms Compared
- Best Ceiling Types for Living Areas
- Main Types of Ceilings Compared
- Ceiling Installation Services in Nairobi
- House Renovation Cost in Runda
- How Much Does House Renovation Cost in Kenya
- Gypsum Ceiling Designs Portfolio
- Gypsum Designs Portfolio
- Local Building Contractors Near Me – Suimas
- Residential House Construction Services – Suimas
